Showing posts with label dirty hand. Show all posts

Thursday, November 28, 2013

Another lease of life - Shimano SPD MT41

My Shimano SPD MT41 with a new outsole

I spend RM240 on this shoe in 2009.  It is more expensive than any other shoes I ever bought. Early this year, it shows some sign of crack on the sole.  I guess rubber being rubber, age plus the wear took a toll on it.  After I saw what Kelolo did to his shoe which had a similar fate, I was interested.  It cost him RM70 for a sole replacement.  

Shoe's anatomy
source: http://en.wikipedia.org/wiki/Shoe#Shoe_construction

Basically, what the Pakcik did was to replace the outsole with a new one, stick it with glue to the existing mid sole, and finally stitches the sole to the upper,   (see diagram above to understand the term).

If you interested in engaging the service, refer to the following map.  The shop close at 10pm.


View Lokasi2 in a larger map

Monday, December 31, 2012

Greasing the wheel hub

Step 1: Remove the right hand side (RHS) bolts from the spindle.

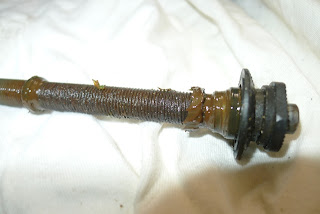
Step 2: Remove the spindle from the wheel hub.  The sludge was due to a mixture of water sipping into the hub, blended with grease.  It always a big No No to ride through a water/river a foot deep due this consequences.

Step 3: The ball bearing resides in the cup a blend of what used to be a grease.  Remove the ball bearing by picking it up using a magnetized screwdriver.

Step 4: Wipe it clean those sludge and some traces of sand on both on side of the hub's cones and anywhere you can see it.  Cotton buds would be the best tool you should use.

 Step 5: Wipe it clean those sludge on these ball bearings.  10 balls bearing on each side for this particular Shimano hub.

Step 6: Put the grease on the cups on both side.  The grease helps to hold the ball bearing in place before you can shove the spindle back into the hub.

Step 7: Tighten the bolts to the point the wheel spin smoothly but it do not move left and right of the spindle.


Thursday, August 26, 2010

Shall you have extra money

A supplementing write-up to Akmal's post on Weight and Reaction

Generally, upgrading means buying lighter parts.  In many cases, more efficient mechanism. 

Wheelset
Those lighter one also has lower rolling resistance on bearing of the hub.  Thus when we upgrade wheelset, we get lighter wheelset and also lower resistance hub than before.  As a result, we pedaling up lighter bike and better power transfer right down to the tire.

Lighter & Better
Apart from wheelset, the following will also contributes to better you in cycling shall you unable to increase your power output (e.g by training more).
1. Change Crankset
2. Change Pedal
3. Change Tire
4. Change Chain
5. Adjust brake pad clearance to avoid rubbing.
6. Clean sludge on drivetrain (chain, cassette, and chainring) due to excessive lube.

I would suggest that you do 5 & 6 first since didn't cost money (maybe a little insignificant cost of brush & detergent).  This maybe another good way to spend your non-riding weekend, after all.. it's Ramadhan.

Friday, August 13, 2010

New-look Oldie

Shogun was green and pretty much in original form here.  I was like lalang, within 2 years from the day I bought this frame, it had been single speed with MTB wheelset, single speed with 27" wheelset, and 9 speed touring.

At one point of time, I even was contemplating to sell this frame for merely RM100.  Thanks for an insulting offer of RM50 from a bidder made me change my mind and keep it for a little bit longer.  After I sold my Specialized, surplus parts from it goes to Shogun.  Not long after that, hard-to-refuse offer from a dear friend to paint my frame with color of my choice.  Next thing I know, I handed him the frame and a week after that it came up in orange.

I collected the frame yesterday afternoon, and apparently.. headset was faced, BB was tapped and faced by Kelolo, all parts get fitted by themselves, really, for real!  However, I wonder why I feel so sleepy now... ZZzzzzzz

Tuesday, May 18, 2010

Parts Spending. Do it wisely (Rear derailer)

I: Why do you change from 7 speeds to Deore 9 speeds groupset.
The person I met in LBS: Because it is 7 speeds!?
 
Impulsive spending
Occasionally I walked into LBS and walked out with something I didn't have intention to buy at the first place. It could be something that I never realize I need it until I saw it. It is like window shopping in ACE Hardware.  However my impulsive spending is limited to cable end, cable housing end, chain lube, shifter cable, brake cable and other consumables.


Parts upgrades
When the part deteriorated in performance or functionality, I'll go for better part replacement. Say that my RD need replacement, well at this moment I have 1 weak reason for it which is the jockey wheel becomes pointy. Since current RD is Shimano XT, better part would be XTR but exorbitant price may not allow my hands on it. So very likely I'll go for XT of the newer model.

For a start, there are 6 variants from current Shimano XT RD which make my choice become harder.  Check out the following: -

1. Top normal, Shadow, Long cage, Direct routing (RD-M772-SGS)

source: bike.shimano.com

2. Top normal, Shadow, Medium cage, Direct routing (RD-M772-GS)

source: bike.shimano.com

3. Top normal, Long cage, Straight pull (RD-M771-SGS)

source: bike.shimano.com

4. Top normal, Medium cage, Straight pull (RD-M771-GS)

source: bike.shimano.com

5. Low normal, Long cage, Straight pull (RD-M770-SGS)

source: bike.shimano.com

6. Low normal, Medium cage, Straight pull (RD-M770-GS)

source: bike.shimano.com

Top Normal - resting pulley is on top i.e. smallest cog (eg. 11T). Downshifting on the shifter requires pushing your thumb on the lever.

Low Normal - resting pulley is on low i.e. biggest cog (eg. 34T). Downshifting on the shifter is by 'release' action by your index finger

Shadow - Non-protruding RD.

Direct Routing - cable comes from top to down.  I believe this overcoming issue with Straight pull.

Straight Pull - cable comes from behind to front, thus the loop with potential to hook on something on trail.

Medium Cage - for chain capacity up to 33T. Eg. 32T/22T chainring, 11T/34T cassette = 33T

Long Cage - for chain capacity up to 45T. Eg. 44T/32T/22T chainring, 11T/34T cassette = 45T

Chain Capacity (aka Total capacity) - result of (biggest cog - smallest cog) + (biggest chainring - smallest chainring)


Decision making
Long or Medium Cage
I'm currently running 36T/22T chainring and 11T/32T cassette on my Kona Cindercone thus my chain capacity is 35T.  This means I can only use Long Cage if I were to use 36T chainring and 32T at any point of time. 
Shortlisted: RD-M772-SGS, RD-M771-SGS, RD-M770-SGS

Top or Low Normal
Since I'm used to Top Normal, using Low Normal requires some adjustment for my brain to register and react subconsciously.  As a matter of fact, all my bikes run Top Normal thus Top Normal would be my choice.
Shortlisted: RD-M772-SGS, RD-M771-SGS

Shadow
Shadow is associated with Direct Routing.  While I like the RD to be less protruding, it comes with a perk of Direct Routing, features that I believe address issue with Straight Pull.
Shortlisted: RD-M772-SGS


Verdict
Top normal, Shadow, Long cage, Direct routing (RD-M772-SGS)

source: bike.shimano.com

Thursday, March 25, 2010

Changing from triple to double chainring


Gear ratio table 1: An original setup of triple chainring


Gear ratio table 2: The new setup of double chainring
Prior migrating from triple chainring to double chainring (and lost 9 gear ratio) I did this table for comparison basis.  It turn out that (expectedly) some gear ratios are 'redundant'.  For example, 1 revolution of crank using 32/16 (front chainring over rear cog) will give same output as 22/11, i.e 2 revolution of wheel.  But again, the use 22/11 (smallest chainring to smallest cassette)  combo is not a good choice since it put an extreme sideways load to the chain.

The reasons I am switching from triple to double chainring were :-
1. less shifting for front derailleur
2. I need an extra 44t and 32t chainring to be fitted on idle crankarm for my touring bike.

In deciding on how many teeth I need for middle chainring (apparently become outer), I need to figure out what were those gear ratios I'll be 'losing' and whether that lost will be very much regretted or not.  In this case, in very rare occasion I used 44/11 and 44/12 combination.  This rare occasion was, downhilling tarmac from Genting Sempah back to Hospital Orang Asli in Gombak.  In some other occurrence, I was on shallow knobbie tires on night ride. flat terrain.  Since this setup intentionally for my ultimate MTB bike i.e. Kona, it will not be an issue.

My choice of 36t chainring was due to it is the best number of teeth for my riding style.  At 36/11 (3.27) , it caters top ratio of slightly over 44/14 combination (3.14).

The Installation
It was quite straight forward if you are familiar with installing and removing chainring for cleaning purposes.  However, I need to emphasize that you need a short stack bolt to tie the chainring to the crank arm.  Other things that matter: -
1. The need to readjust (read: lower) the FD's clamp on seatpost.  And it comes with PIA of FD tuning.
2. Protruding bottle cage's tab may obstruct FD's clamp.
3. FD's cage only can gets lower to the point it hits the chainstay.  This cause top of the cage may not have an ideal clearance on largest chainring.
4. Optionally, the chain may be shorten by 1 link to compensate chain slack.
5. And again, FD requires precise, perfect and painstaking adjustment to avoid chain derailed outward (it did happened to me). Alternately, fitting a bash guard may prevent this mishaps.


Friday, October 30, 2009

The making of Skinny Bitchykal

A rather hilarious dialogue when Hitler ask those roadie to
leave the room.

"Those of you that have been riding your skinny tire sissy bikes with you gay shaved legs, get out. Now." - Hitler in Hitler
movie.

Having said that, I was building up a road bike and about to become a roadie myself.  Minus the gay shaved legs.


The making of Skinny Bitch
Day 1
1. From bare frame, fit the headset & fork.
2. Fitted brake caliper, wheelset (not yet service), crankset, FD, RD, seatpost saddle, handlebar & brake/shifter lever.
3. Fitted the brake cables


Day 2
1. Serviced rear hub, apply new grease.
Issues
1. Fitted shifter cables. Harsh shifting for FD. RD shifting doesn't work
2. Steerer tube too short.


The sludge


Loose bearing of rear hub


New grease


A handle too low for a road bike


Day 3
1. Fixed my boo boo previous day causing the RD didn't shift.
2. Bianchi fork replaced with Trigon.
Issue
From 1" steerer tube to 1 1/8" thus cannot use Deda 1" stem.
Probably need new complete headset.


Going for 1 1/8" from 1" steerer tube.


Day 4
1. Fitted stem from Shogun
2. Fitted chain
3. Fitted worn shifter hood
4. RD/FD tuning
5. Test run on trainer


Shifting test run on a trainer


Day 5
On the road test by Shaque, Zali & Pak Abas.
1. Adjusted saddle height, saddle to stem length, saddle angle.
Issues need to be addessed
1. On large cog (cassette), spokes are slapping the RD's cage. Need spacer on freehub
2. A little freeplay on crank due to BB. Will replace with spare BB.
3. A little short cable casing for rear brake. Will replace
4. FD need more tuning.
5. Tire desperately need replacement.


Day 6
Fixed the following.
1. Replace BB with Ultegra
2. Spacer on freehub didn't work. The smallest cog can't firmly engage on freehub's spline. Solution: shorten the chain by 1 link resulted RD's cage extended lower than before and better clearance from spokes.
3. Replaced rear brake cable casing.
4. FD tuned, still can't get the perfection.


Day 7

Skinny Babe test rides Skinny Bitch


Day 10

My first attempt to fit a bartape.

Day 14

Test ride to HOA, Gombak.

Friday, October 2, 2009

Spesh SingleSpeed


After selling many Spesh's parts to a friend for building her bike, Spesh was left idle and collecting dust. My initial intention was to sell it off, but after much consideration I decided to make a second attempt to SingleSpeed it. There was another attempt on singlespeed Shogun which ended me with hard fall and a broken helmet. There are 2 most important element of singlespeeding your bike; 1. chain line, 2. chain tension.

First attempt about a year ago.
Cog taken from Deore cassette, sandwiched between 2 larger cogs. Make use old Tourney Rear Derailer as chain tensioner. Note the straight chain line of cog and chainring.

I found this Da Bomb 9 to 1 Pro conversion kit for freehub body (RM65,BicycleWorld, Tmn Melawati) that comes with 18t and 16t cog.


It was 2 strikes of luck when: -
1. pretty straight chain line
2. the chain tension was sufficient on 42t chainring without the need of chain tensioner.

42:16 gear ratio suits me well on flat tarmac. Come the hill, I'll do it standing.


Addendum (05 Oct 2009)
Parts for my singlespeeding project.
1. Complete MTB minus gearing system (FD, RD, Shifters)
2. 42T Shimano Exage crank (est. RM50)
3. Da Bomb 9 to 1 Pro conversion kit (RM65)
4. 7 speed chain (est. RM20)
more on singlespeeding on MTBR here

Wednesday, August 5, 2009

Cycling is expensive hobby?

Celebrating 2 years in cycling, I try to summarize my spending in cycling, for your consumption & judgment.
In the keen interest of cycling, I'm indulged and being happy about it.


How does it start

Prior July 2007, a number of time, I been approached by Jazlan to take up mountainbiking. I had a keen interest but forking RM2000 for a bike wasn't that easy at that point of time. An angel came down in a form of human and gave me RM2,500 soft loan for a kick start.

Initial "investment"
I bought myself Scott Scale 70 for RM2.3k from BikePro (thanks to Big Mac for his time and consultancy). Immediately I went to KHS for a Limar 911 helmet at RM280, the only helmet that fits my big head at that point of time. The list go on an on. Glove, bladder, allenkey toolset, spare tube, shoes, cycling jersey, lycra pants, and more tools. After spending a total of RM3k, I may become insane keeping the record of my spending list.

More spending
Soon enough, I endo during first night ride in RRI, bent my saddle (body injury will recover, parts injury won't). So I replaced with Velo Carbon (new, RM120).
Weekend ride dosage seems insufficient, bought blinker and light in order to ride at nite.
Cassette and chain worn, replaced.
Straight handlebar caused numb wrist, replaced.
Running shoe double as cycling shoe caused slippery pedal grip, bought HiTech trail shoe (new, RM240).

Even more spending
V-Brake failed on me, bought Avid BB7 (new, RM350).
Joined the clipless bandwagon, bought SPD pedal and shoe (used, RM250).
SPD design flaw caused numerous stupid falls, changed to Crank Brothers pedal (used, RM100).
Another clipless shoe, Shimano MT41 (new, RM240).
Bought Spesh frame from Big Mac to inflict others in the family (used, RM250).
Bought bundle parts from Jazlan to assemble Spesh (used, RM100).

Recent years..
Before I blow a candle celebrating 2 years in cycling this August, I have 2 full fledged MTB for trail ride, and 2 rigid fork MTB with slick tires for tarmac ride. Now, contemplating to sell off my Spesh for my bed space. Obviously, I need space to sleep.
Proper sleep prior to next morning rides is important!

First and forth wives live happily ever after.


p.s:
  • Angel, knowing your preferences to be below the radar, I shall not mention your name you here but you know who you are.
  • LHDN, I had received your additional deduction to my salary. Nothing left here, move on!
  • Thief, you took my son's BMX, please return it to him. He's not tall enough for my MTB. Thank you in advance.
  • Potential thief, you may be electrocuted if you try something nasty. BTW, alloy is a good conductor.

Wednesday, June 3, 2009

How did I replaced front hub cartridge bearing?

Where did I get this spoilt hub?
I bought front wheelset from Mr Beskal for a darn cheap price. He warned me that the hub need replacement and I may just end up able to make use of the rim and spokes only. Truth been told, the right side cartridge bearing has some freeplay.

How did I reached "the point of no return"?
I did some reading on the Net to get some idea on how to remove the bearing on this particular WTB Momentum front hub but to no avail. I asked my bike repair guru (Uncle ABC), LBS’s owner of Advance Bicycle Centre in Sri Damansara for some tips, he mentioned that some type can, some can’t be removed. Fair enough, I grabbed plastic mallet on my way home and decided to give a try. After all, I can’t do more harm to a spoilt bearing. If I failed to remove it, get a new hub. Fail or succeed, I’ll learn something. Either learns on how to do it the right way or how to mess it up.

The SOP
Here's the pictorial SOP for my own reference in future.

Step 1

The “OK” side of the hub


Step 2

The ”spoilt“ part of the hub. Notice that rusty sludge? Loosen the nut, hammer tap the spindle with plastic mallet.


Step 3

Bearing on the other side of the hub poked out.


Step 4

Pull the spindle all the way out.


Step 5

The hub anatomy minus the hub body and skewer.


Step 6

Use vernier scale to get the measurement of Outer Diameter (O.D), 26mm.


Step 7

Inner Diameter (I.D), 10mm.


Step 8

Thickness, 8mm.

Step 9

Vital stats for part hunting.

Step 10
At this stage, I need to check if this bearing readily available on the Net. If it is, high chance I can get it from an outlet at Jalan Ipoh, Kuala Lumpur.

Keyword search in Google.com .......
cartridge bearing 10 26 8

And here you are!!

Cartridge bearing of this particular dimension is also known as 6000 in it's industrial code.

Where did I found this 6000 cartridge bearing?
I was traversing Jalan Ipoh for SKF and before I stepped into their office, I was courteously stopped by a staff offering helps. According to him, SKF office do not keep stock and he asked me to try the shop next door, Brighton Bearing (M) Sdn Bhd (check out the location on Google Maps here).

The hunt is over :)


A relieving sight of solution

A nice uncle attended me with my Q&A. After exchanging friendly conversation with that nice uncle, I left the shop with a pair of 6000 cartridge bearing.


RM8 per piece.


The old bearing on the left. New NSK bearing on the right side.


The SOP (resume)
Step 11

Tighten the nut to press the bearing into the spindle (not shown here).
To insert the outer bearing into the body hub, I put spoke wrench on the bearing and tap with rubber mallet to give an even pressure.

Step 12

Slip in the "water jacket" until it snap into the groove.

Step 13 (optional)

Truing the wheelset for a perfect roundness